“Essential wiring steps for building an off-grid solar system
However, building an off-grid solar system can be a complex and daunting task, especially when it comes to the wiring. In this article, we will guide you through the essential wiring steps for building an off-grid solar system, ensuring that your renewable energy setup is safe, efficient, and reliable.
Understanding the Components
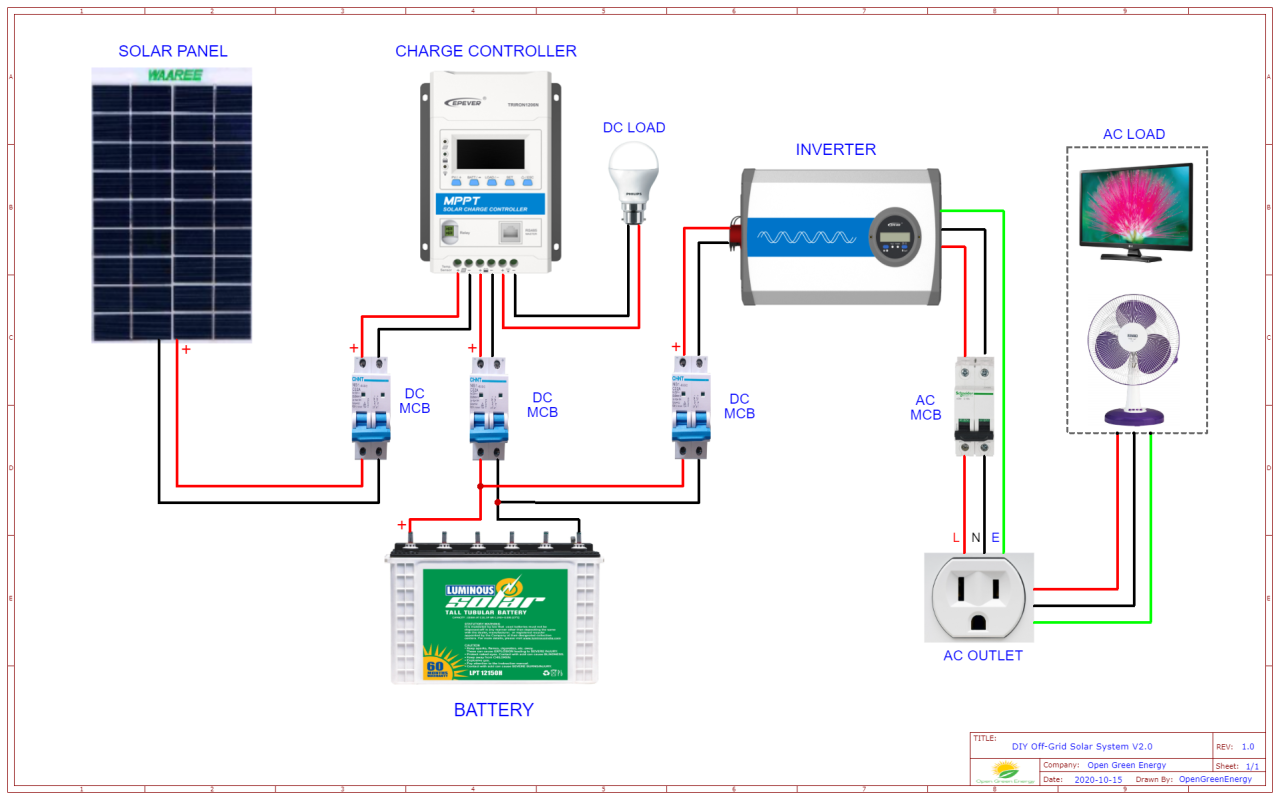
Before diving into the wiring steps, it’s essential to understand the components involved in an off-grid solar system. These typically include:
- Solar Panels: These convert sunlight into direct current (DC) electricity.
- Charge Controller: This regulates the flow of energy from the solar panels to the battery bank, preventing overcharging and damage.
- Battery Bank: A group of deep-cycle batteries that store excess energy generated by the solar panels for later use.
- Inverter/Charger: This converts DC power from the battery bank into alternating current (AC) electricity, suitable for powering household appliances.
- Distribution Panel: A central hub that distributes power to various parts of the system, including the inverter, lighting, and other appliances.
Wiring Steps
To build an off-grid solar system, follow these essential wiring steps:
Step 1: Plan Your System
Before starting any wiring work, it’s crucial to plan your system carefully. Consider the following factors:
- Energy Requirements: Calculate your daily energy needs based on the appliances you plan to use.
- Solar Panel Configuration: Determine the number of solar panels required to meet your energy needs.
- Battery Bank Size: Calculate the size of the battery bank needed to store excess energy.
- Inverter/Charger Selection: Choose an inverter/charger that suits your system’s energy requirements.
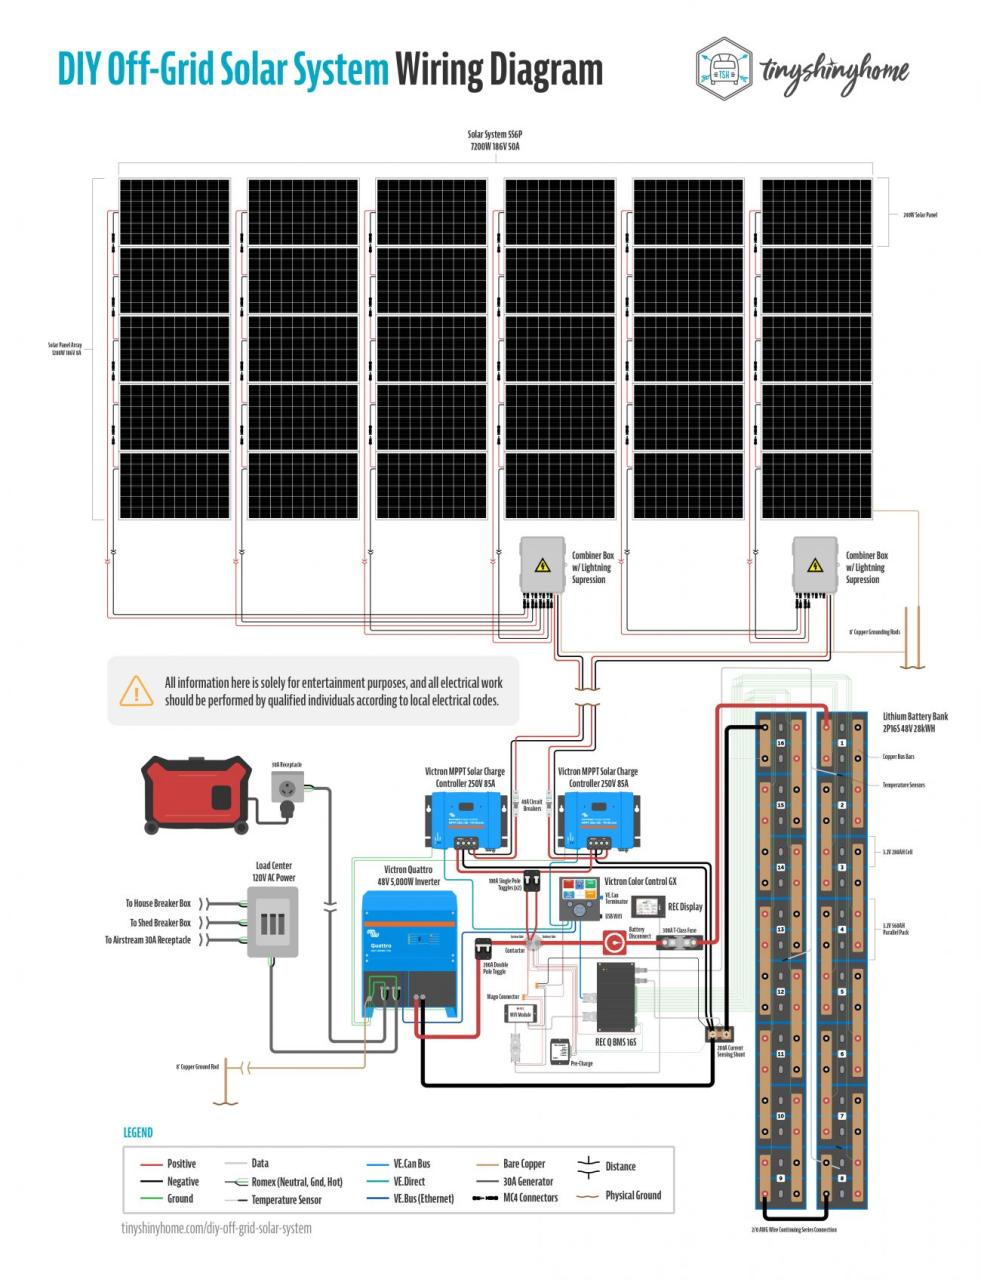
Step 2: Connect Solar Panels

Connect the solar panels in a series or parallel configuration, depending on your system’s voltage and current requirements. Ensure that:
- Positive Terminals: Connect the positive terminals of each solar panel to the charge controller’s input.
- Negative Terminals: Connect the negative terminals of each solar panel to the charge controller’s input.
Step 3: Connect Charge Controller
Connect the charge controller to the solar panels and battery bank:
- Charge Controller Input: Connect the charge controller’s input terminals to the solar panels.
- Charge Controller Output: Connect the charge controller’s output terminals to the battery bank.
Step 4: Connect Battery Bank
Connect the battery bank to the charge controller and inverter/charger:
- Positive Terminals: Connect the positive terminals of the battery bank to the charge controller’s output and inverter/charger input.
- Negative Terminals: Connect the negative terminals of the battery bank to the charge controller’s output and inverter/charger input.
Step 5: Connect Inverter/Charger
Connect the inverter/charger to the battery bank and distribution panel:
- Inverter/Charger Input: Connect the inverter/charger input terminals to the battery bank.
- Inverter/Charger Output: Connect the inverter/charger output terminals to the distribution panel.
Step 6: Connect Distribution Panel
Connect the distribution panel to the inverter/charger and various appliances:
- Inverter/Charger Output: Connect the distribution panel to the inverter/charger output.
- Appliance Connections: Connect the distribution panel to various appliances, such as lighting, refrigerators, and computers.
Step 7: Grounding and Bonding
Ensure proper grounding and bonding of your system to prevent electrical shock and ensure safe operation:
- Grounding Rod: Connect a grounding rod to the system’s negative terminal.
- Bonding: Connect all metal components, including the solar panels, charge controller, and inverter/charger, to the grounding system.
Step 8: Testing and Commissioning
Test and commission your off-grid solar system to ensure it’s functioning correctly and safely:
- Voltage and Current Checks: Verify that the system is producing the expected voltage and current.
- Load Testing: Test the system under various loads to ensure it can handle the energy demands.
Safety Considerations
When building an off-grid solar system, safety should always be your top priority. Ensure that:
- Proper Wiring: Use proper wiring techniques, including color-coding and labeling, to avoid confusion and electrical shock.
- Personal Protective Equipment: Wear personal protective equipment, such as gloves and safety glasses, when working with electrical systems.
- System Monitoring: Regularly monitor your system’s performance and adjust settings as needed to prevent overheating, overcharging, or other issues.
Best Practices
To ensure a reliable and efficient off-grid solar system, follow these best practices:
- Use High-Quality Components: Invest in high-quality components, including solar panels, charge controllers, and inverters, to ensure reliability and performance.
- Regular Maintenance: Regularly inspect and maintain your system to prevent issues and optimize performance.
- System Upgrades: Consider upgrading your system as technology advances and energy requirements change.
Conclusion
Building an off-grid solar system requires careful planning, attention to detail, and a focus on safety. By following the essential wiring steps outlined in this article, you can create a reliable and efficient renewable energy system that meets your energy needs. Remember to always prioritize safety, use high-quality components, and follow best practices to ensure a successful off-grid solar system installation. With the right knowledge and expertise, you can enjoy the benefits of off-grid solar energy and reduce your reliance on the grid.
Leave a Reply